
Connecting Meshtastic to Home Assistant: Your Complete Guide
Published by Vivian van Zyl in Meshtastic the 02/20/2025 at 02:29 am

Welcome to the ultimate guide on connecting your Meshtastic nodes to Home Assistant! In this blog, we'll explore how to seamlessly integrate these powerful IoT devices, enhancing your smart home capabilities like never before.
Table of Contents
- Introduction to Meshtastic and Home Assistant
- Installing Home Assistant on Raspberry Pi
- Connecting Home Assistant to WiFi
- Creating Your Home Assistant Account
- Installing SSH Add-On
- Installing Mosquitto Broker Add-On
- Setting Up MQTT Explorer
- Adding MQTT to Home Assistant
- Configuring MQTT in Configuration.yaml
- Setting Up MQTT Discovery in Home Assistant
- Viewing MQTT Messages with Explorer
- Wrapping Up
- FAQ
Introduction to Meshtastic and Home Assistant
Meshtastic is an innovative solution that allows you to create a mesh network using low-cost LoRa devices. This technology enables long-range communication without relying on traditional internet infrastructure. When you connect your Meshtastic nodes to Home Assistant, you can leverage the power of automation and data visualization within your smart home setup.
Home Assistant acts as a central hub that integrates various smart devices, providing a unified interface to manage and monitor them. With Meshtastic, you can easily track environmental data, monitor device status, and even control your nodes from within Home Assistant. The possibilities are extensive, and the integration enhances your smart home experience significantly.
Installing Home Assistant on Raspberry Pi
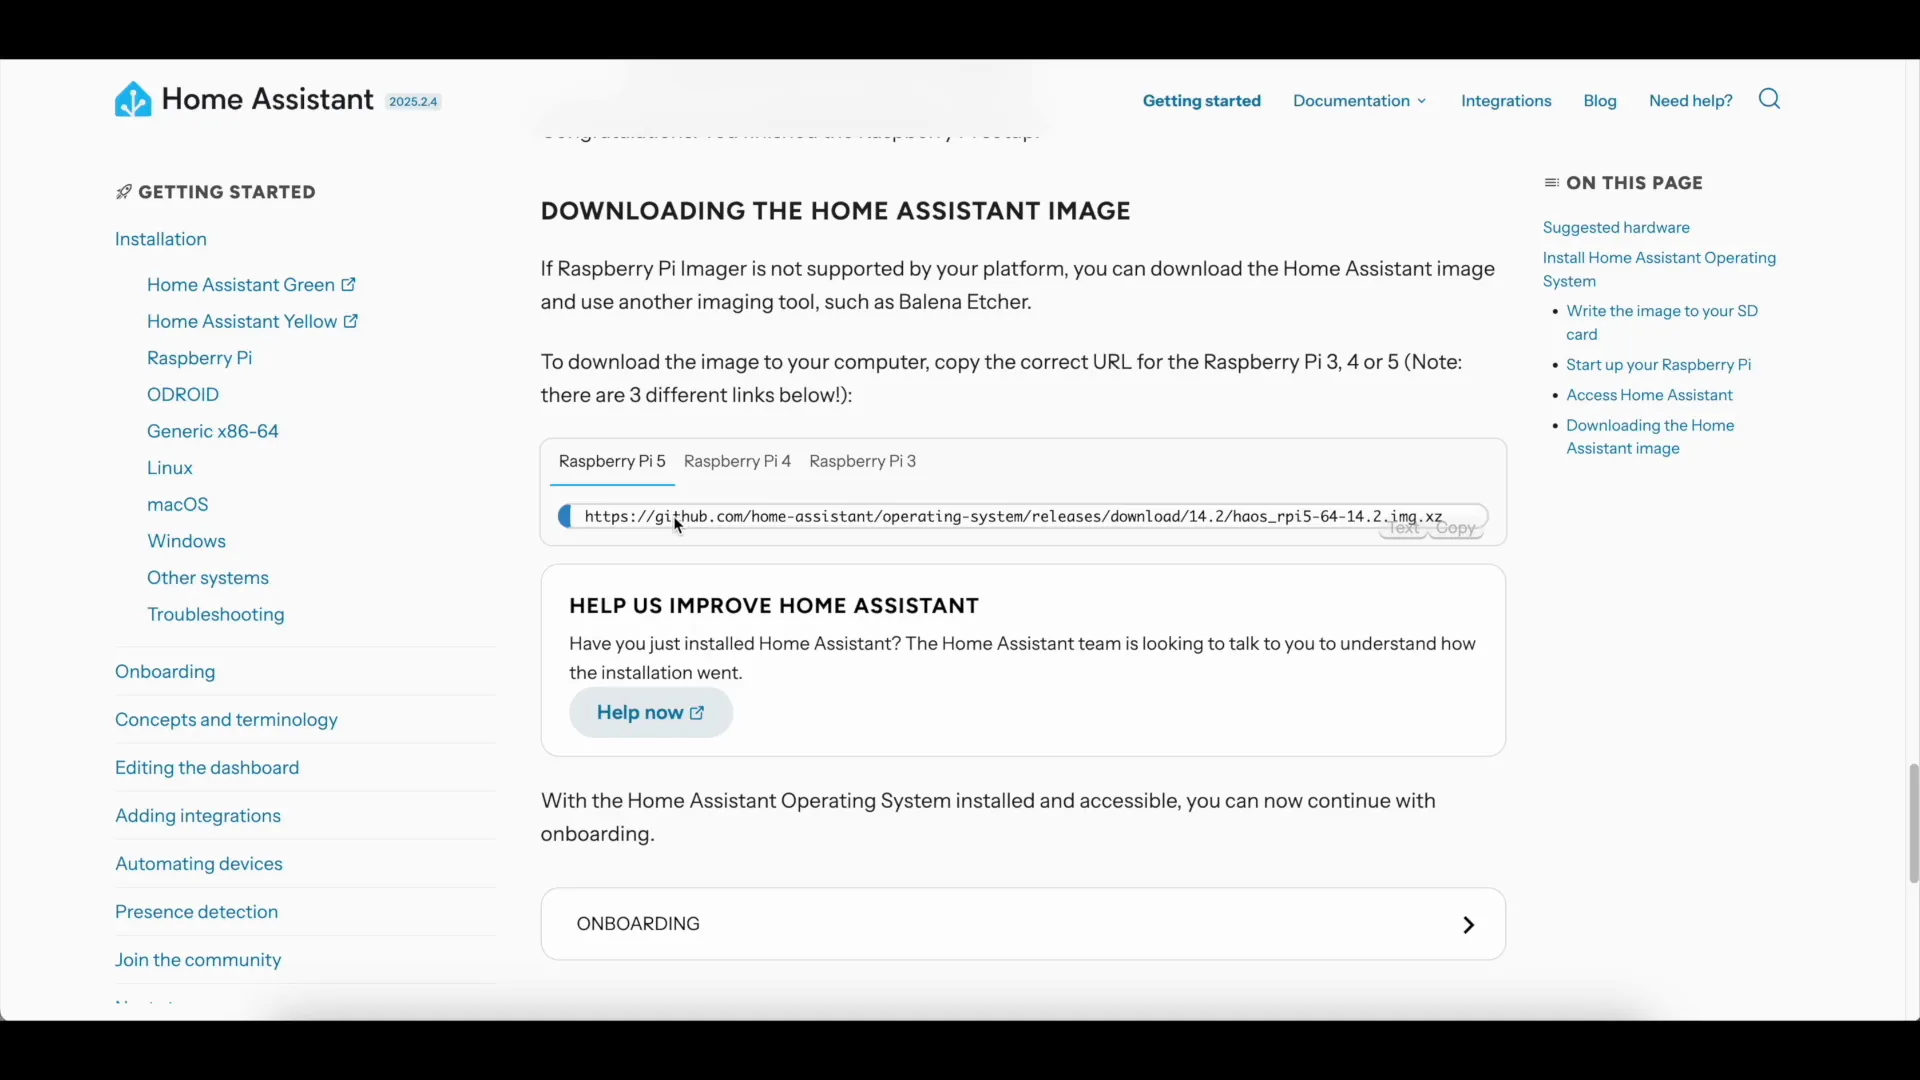
To get started, you'll first need to install Home Assistant on a Raspberry Pi. This process is straightforward and only requires a few steps. Begin by downloading the Home Assistant Operating System (HAOS) image suitable for your Raspberry Pi model.
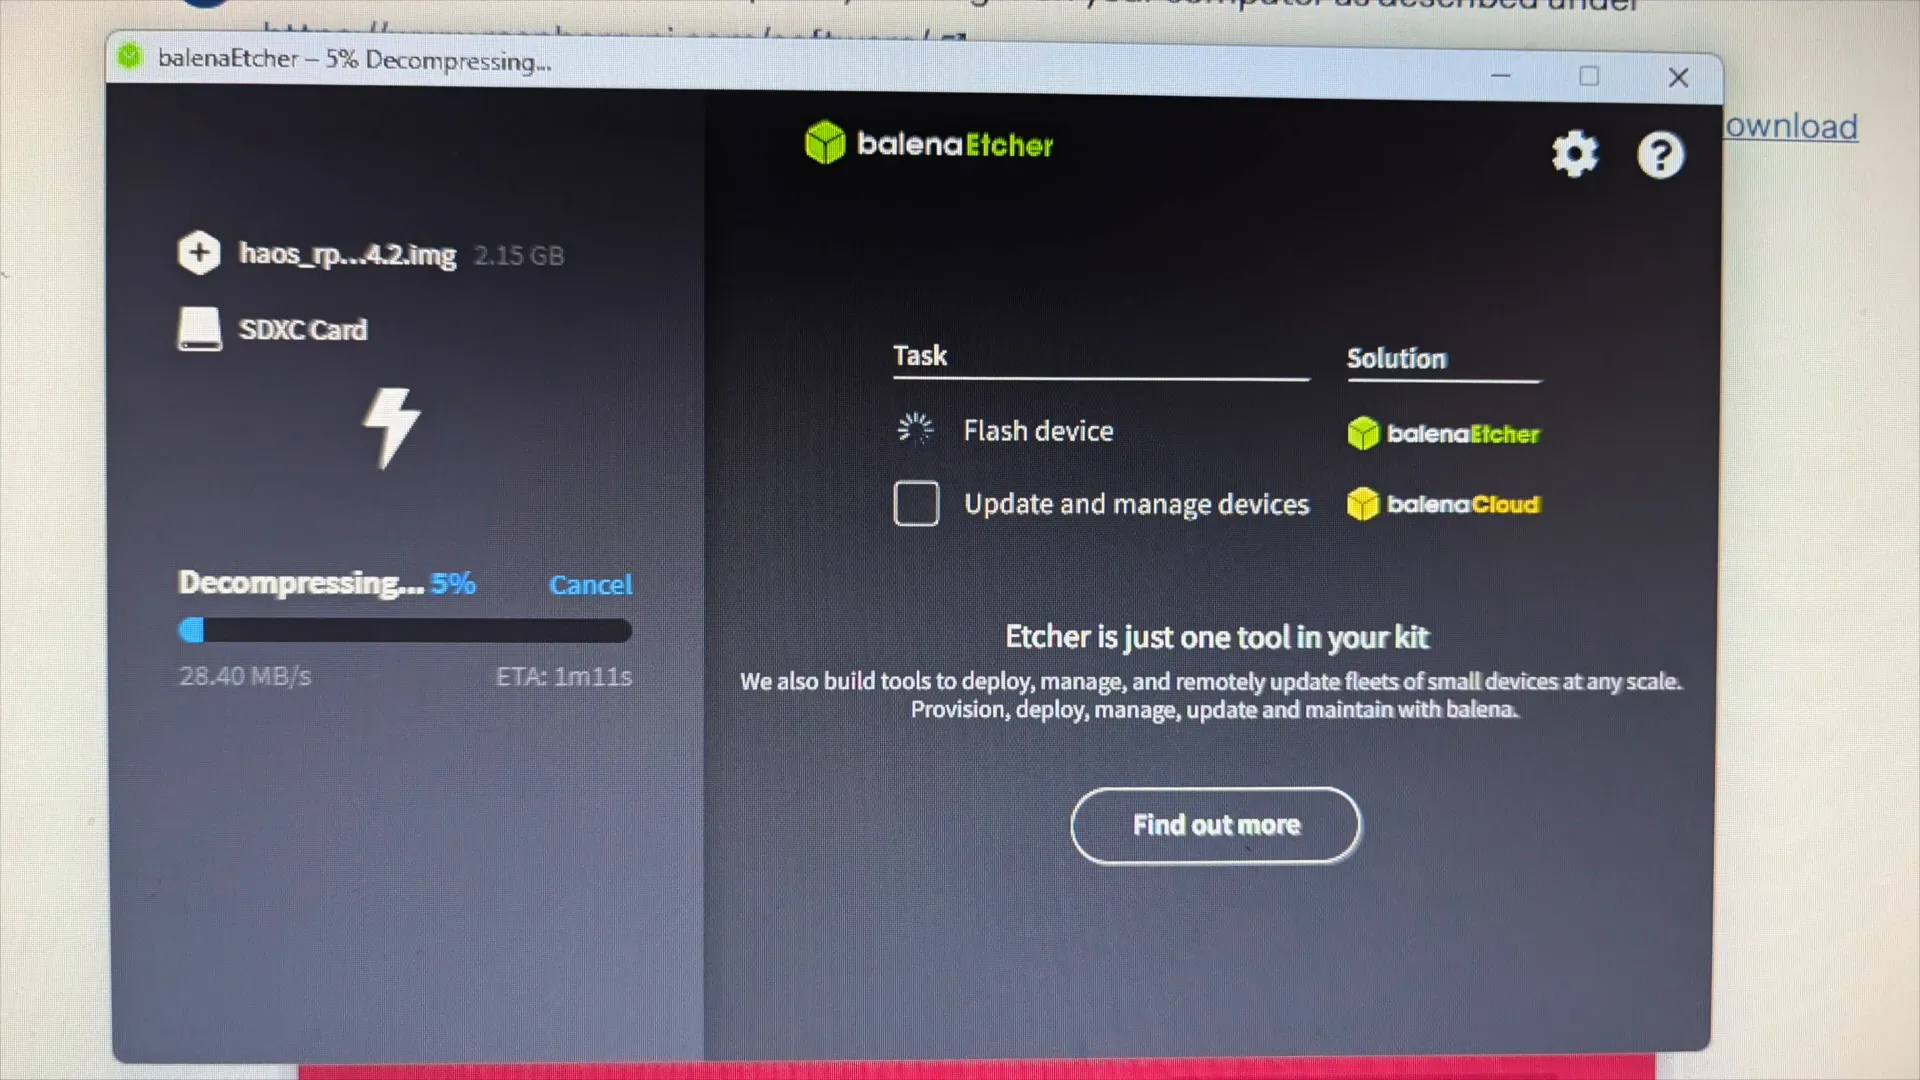
After downloading the image, you'll need to flash it onto an SD card. I recommend using Balena Etcher for this task, as it simplifies the flashing process. Insert your SD card into your computer, open Balena Etcher, and select the downloaded HAOS image. Then, choose your SD card as the target and click on 'Flash'.
Once the flashing is complete, insert the SD card into your Raspberry Pi, connect it to a monitor, keyboard, and power it up. The booting process should take a few minutes, after which you'll be greeted by the Home Assistant setup interface.
Connecting Home Assistant to WiFi
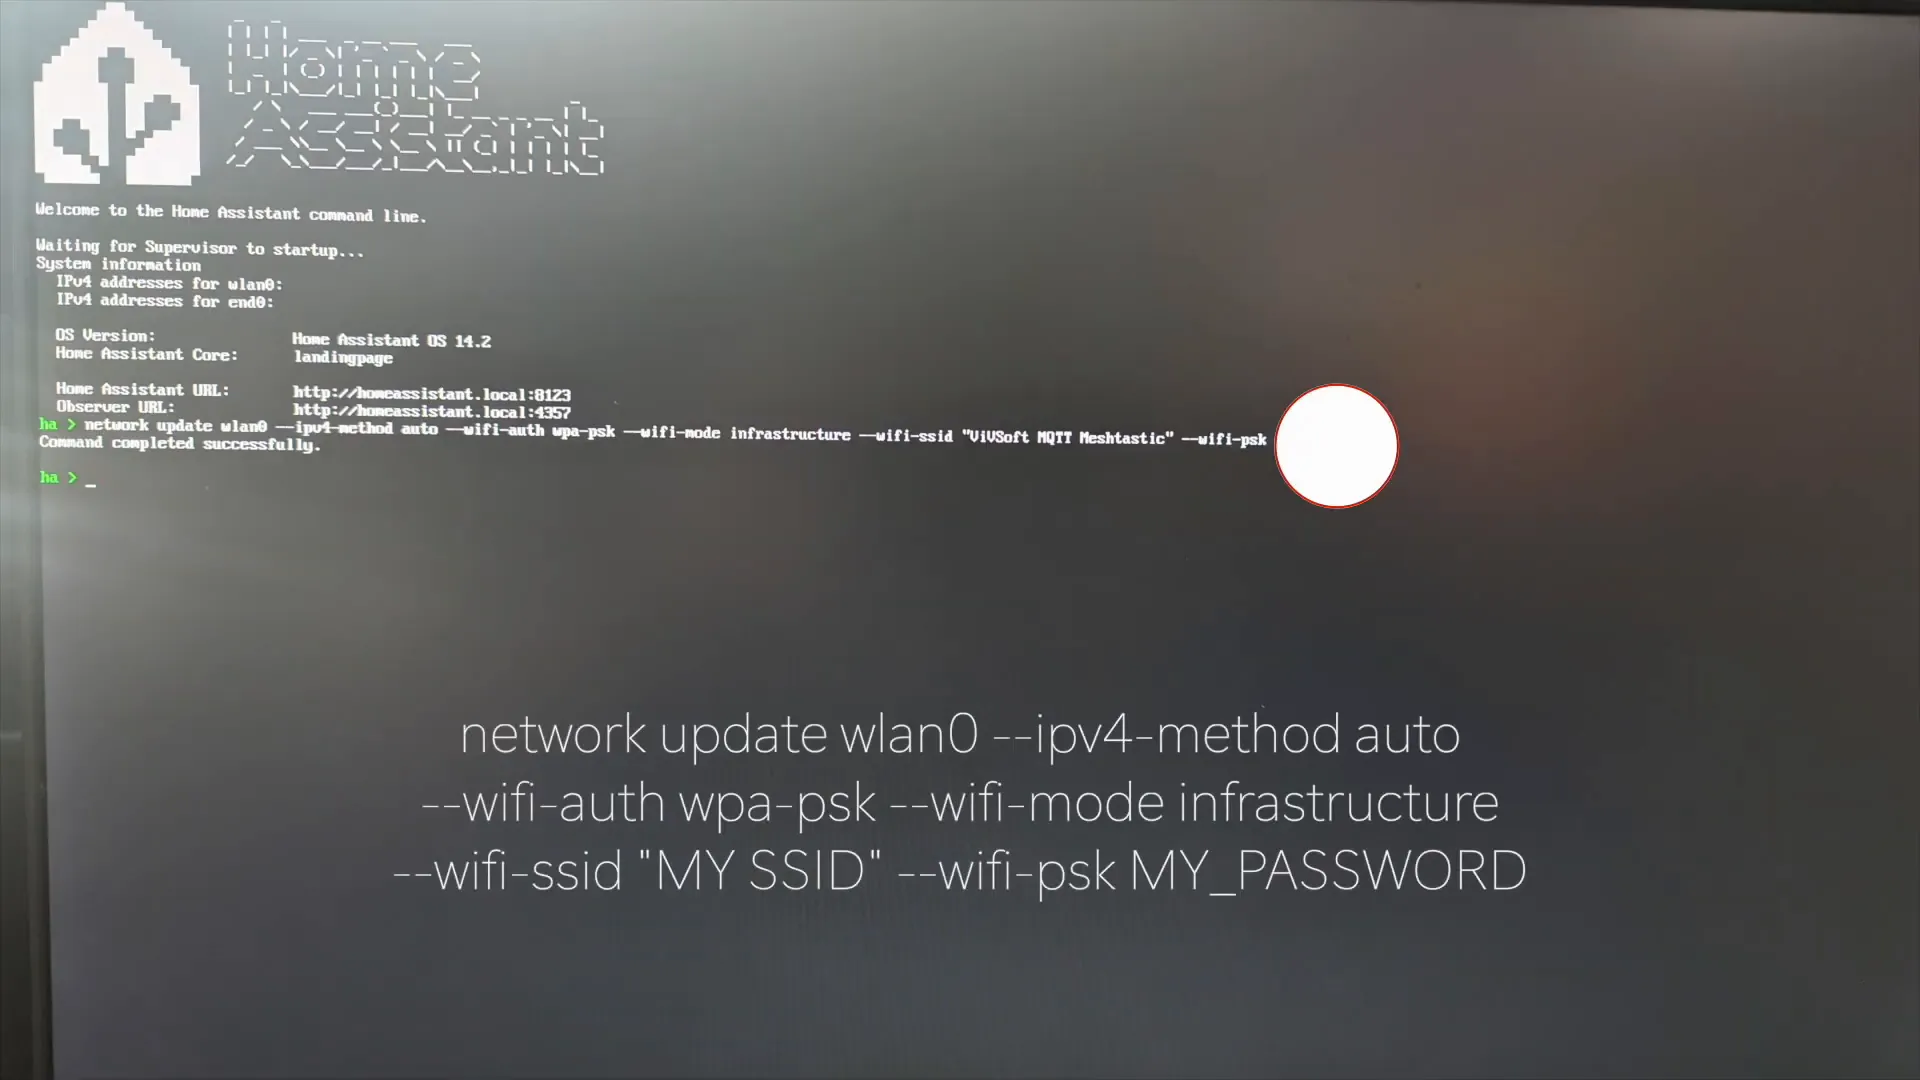
After Home Assistant is running, the next step is to connect it to your WiFi network. If you prefer a wired connection, you can skip this step. For WiFi, navigate to the WiFi settings in the Home Assistant interface and select your network.

Enter your WiFi password and save the settings. Once connected, Home Assistant will restart, and you should see it connected to your WiFi network. If you encounter any issues, try connecting an Ethernet cable temporarily to ensure a stable connection during setup.
Creating Your Home Assistant Account
With Home Assistant connected to your network, it’s time to create an account. This account will allow you to access and manage your smart home devices. You’ll need to provide a name, username, and password when prompted during the setup process.
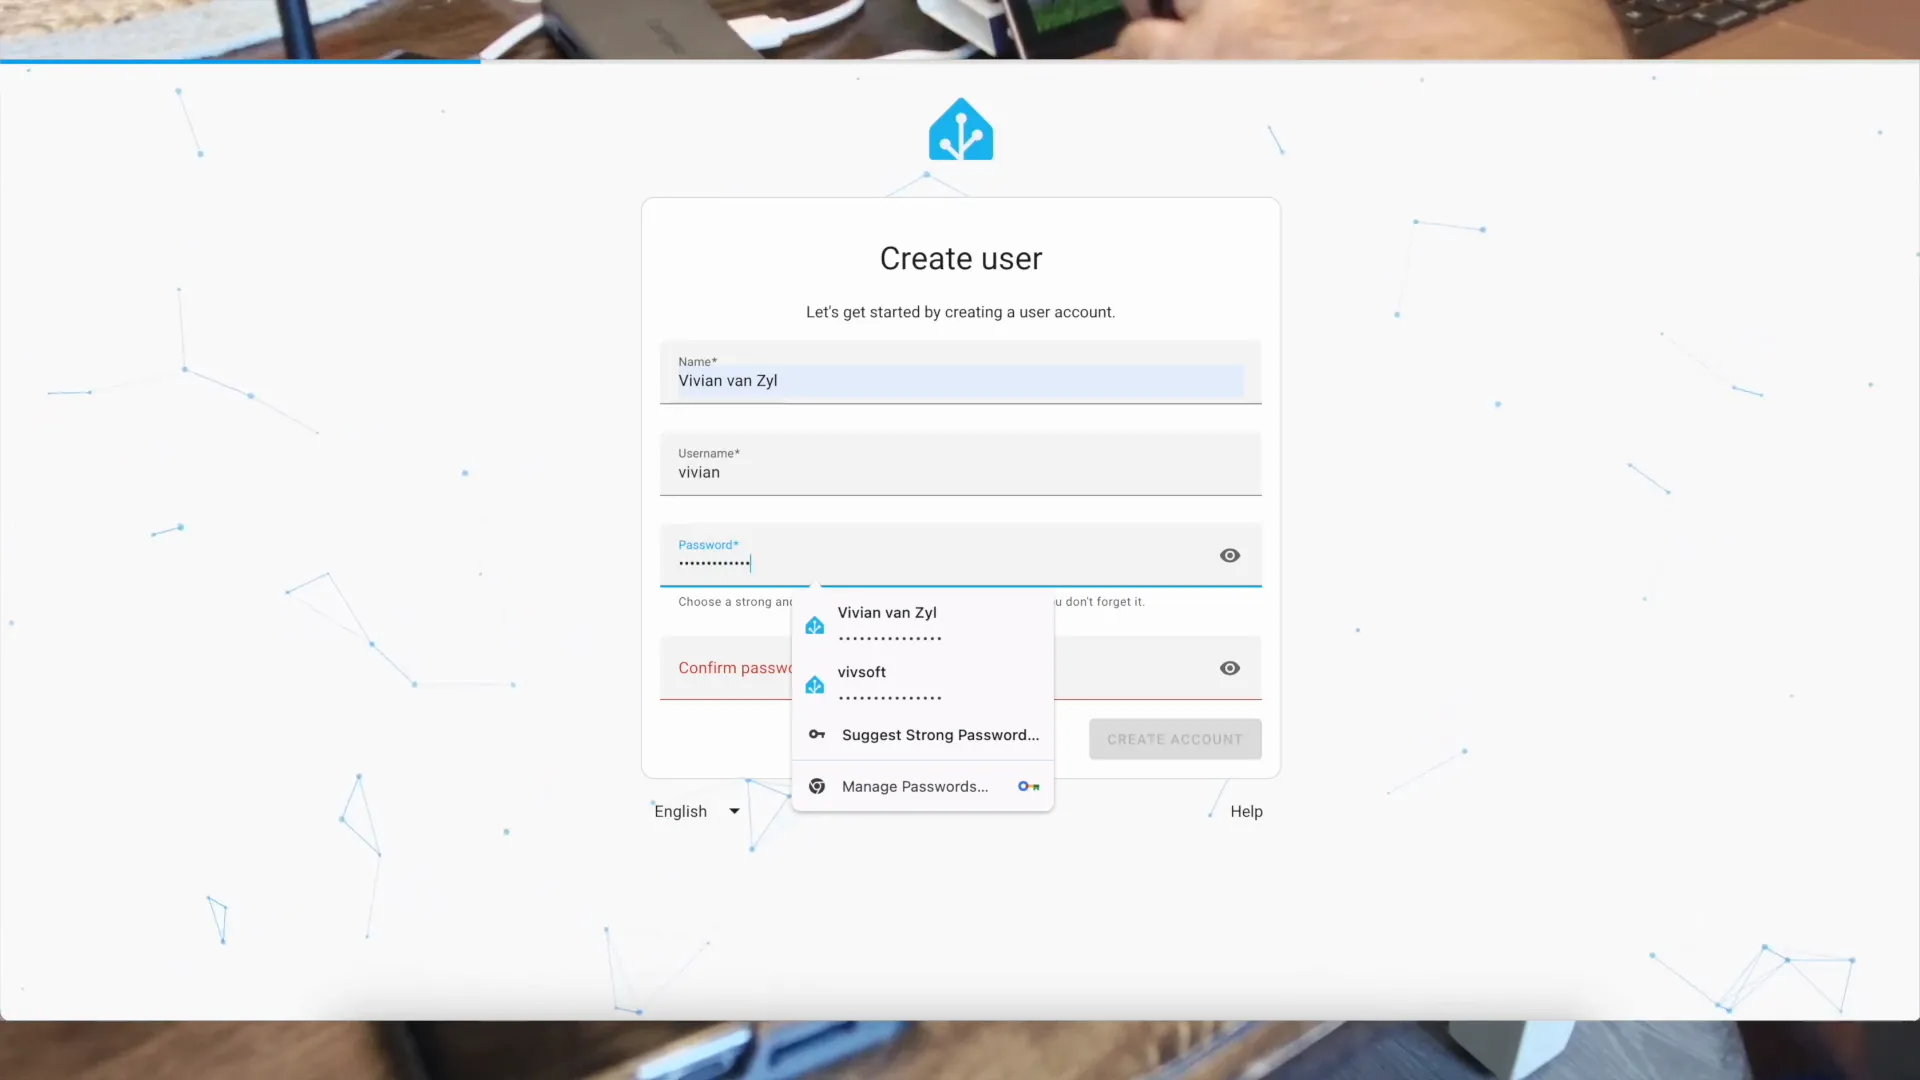
Once you've filled in your details, click 'Create Account'. You may also need to specify your location, which is helpful for automations that rely on geographical data.
Installing SSH Add-On
To manage your Home Assistant setup more effectively, installing the SSH add-on is essential. This allows you to access the terminal and edit configuration files directly. In the Home Assistant interface, navigate to the Add-On Store and search for the 'Advanced Web Terminal & SSH' add-on.
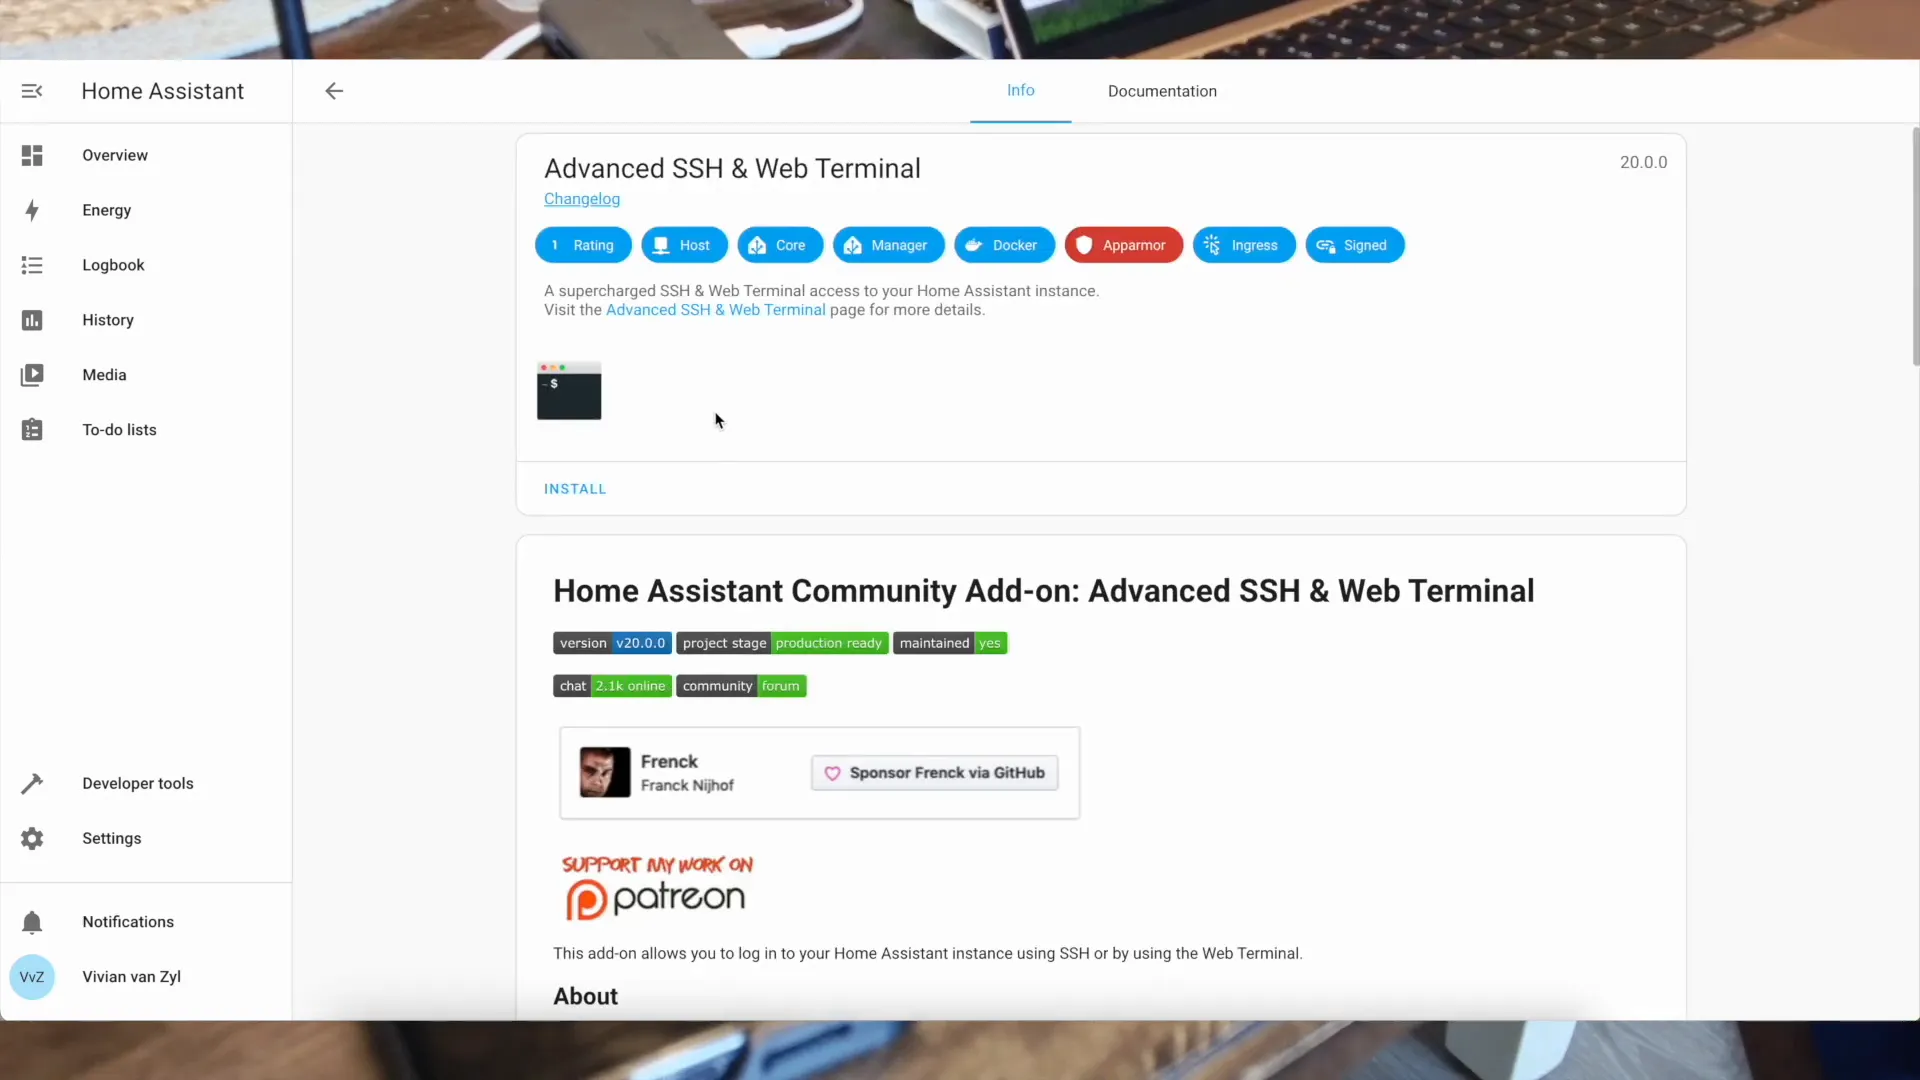
Click on 'Install' and configure it to start on boot. Make sure to set a strong password for security purposes. Once installed, you’ll find the terminal option in the sidebar, allowing you to access the command line directly.
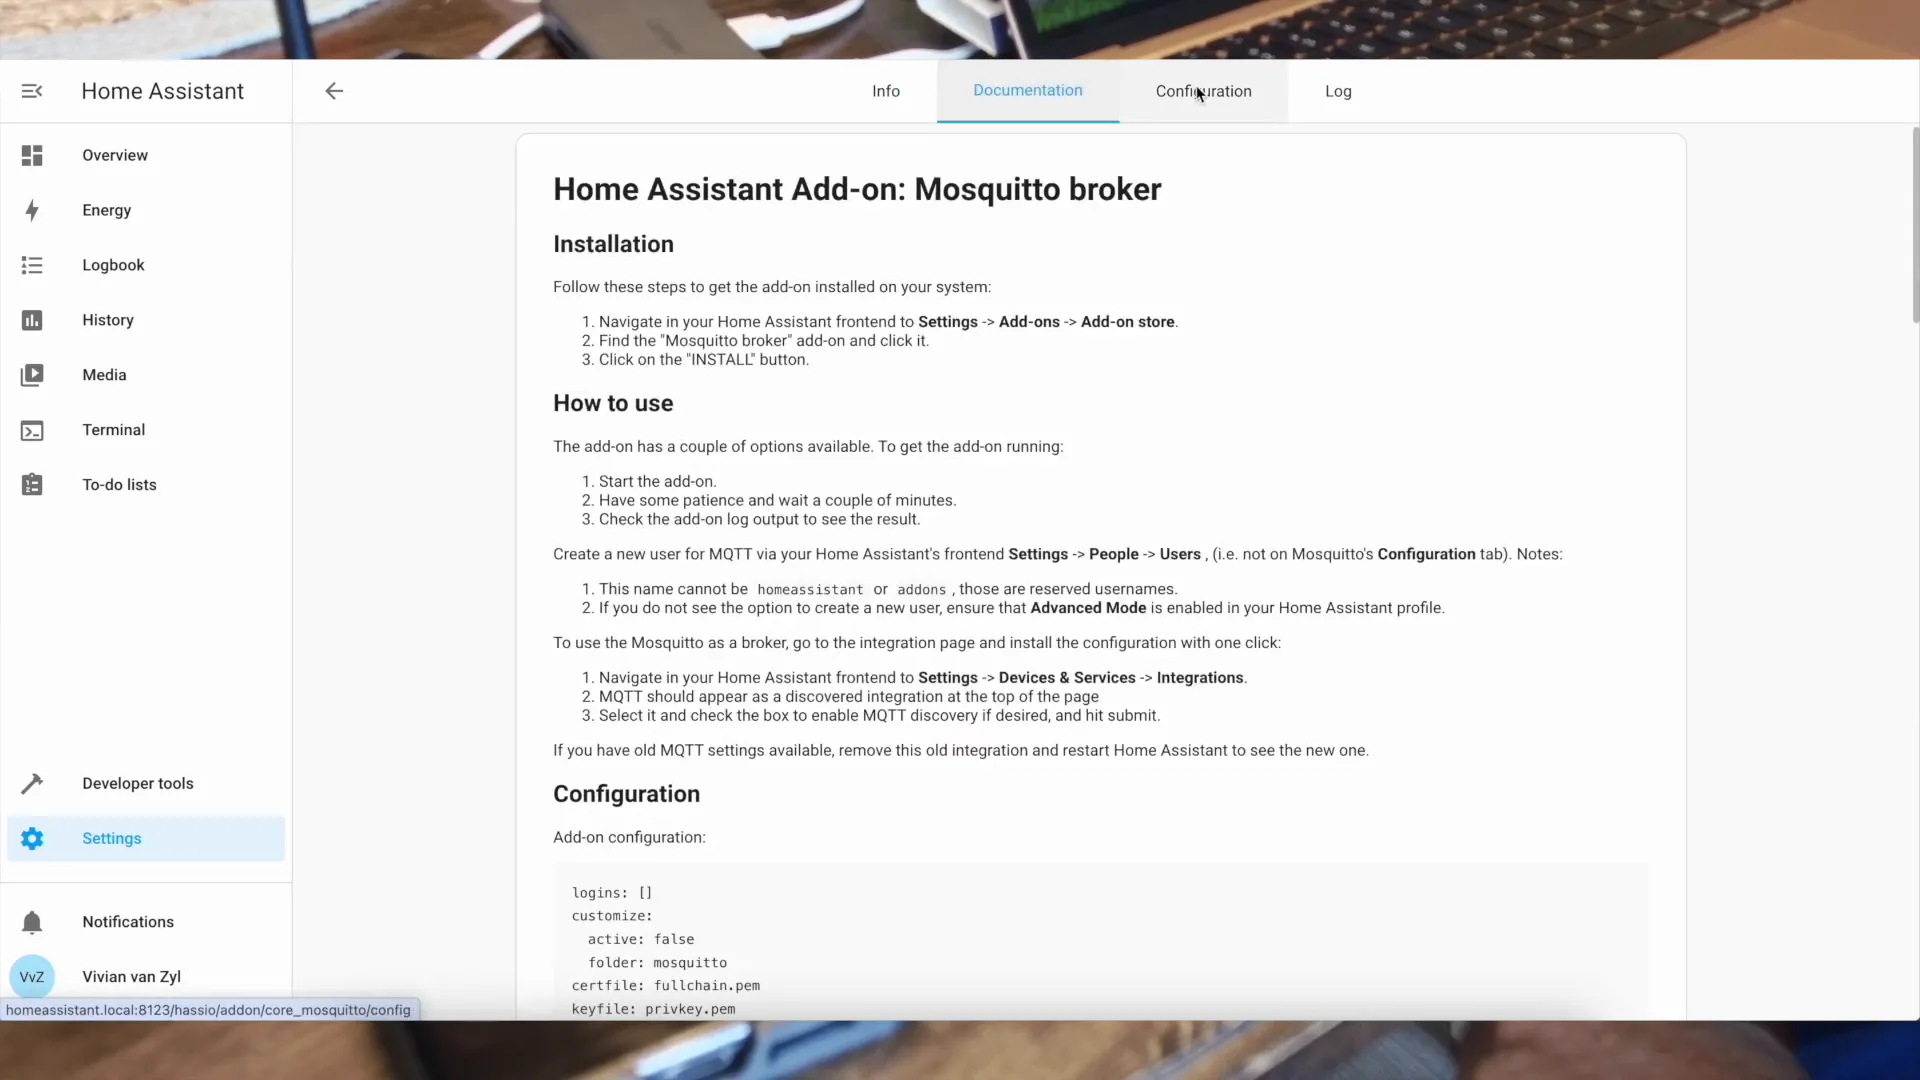
Installing Mosquitto Broker Add-On
Next, you need to install the Mosquitto broker, which will facilitate MQTT communication between your Meshtastic nodes and Home Assistant. Again, head to the Add-On Store and search for 'Mosquitto broker'. Click on 'Install' and configure it to start at boot.
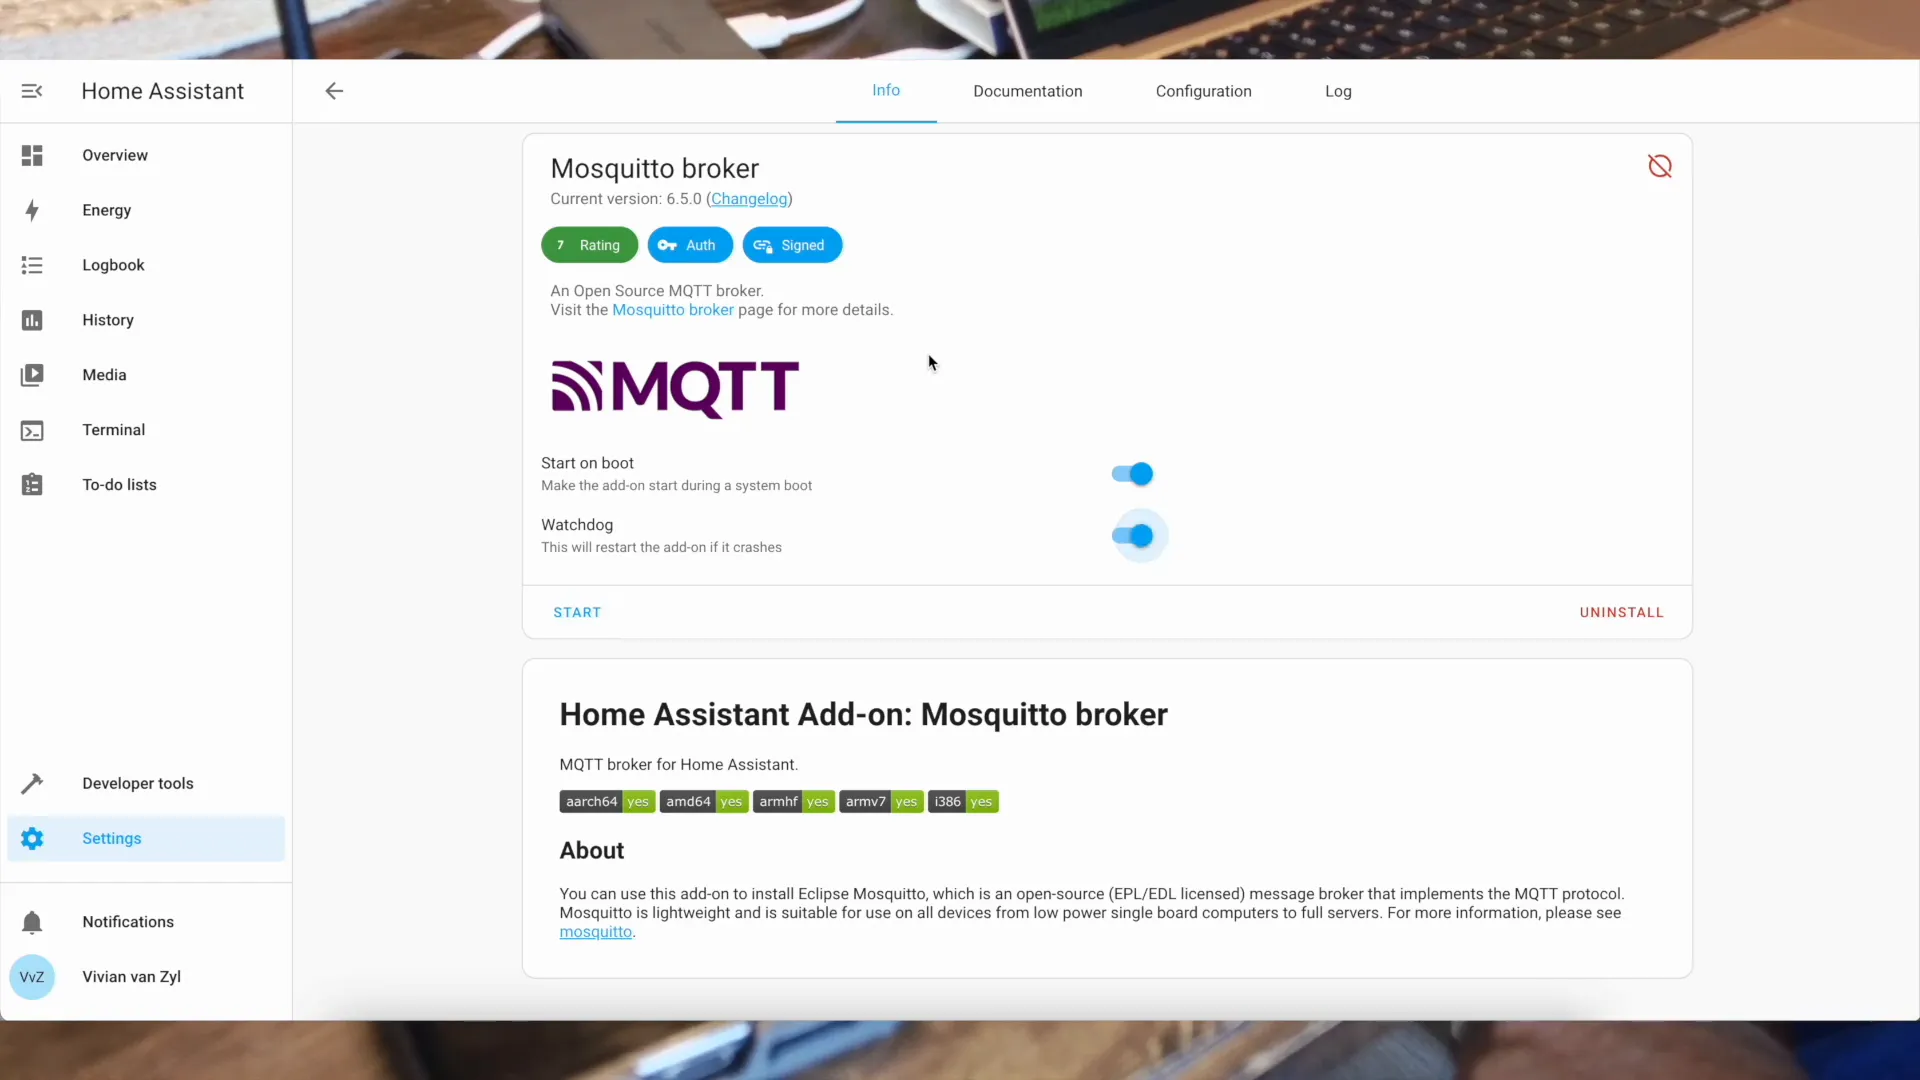
Once the installation is complete, start the Mosquitto broker. This will allow your Meshtastic nodes to communicate with Home Assistant over MQTT.
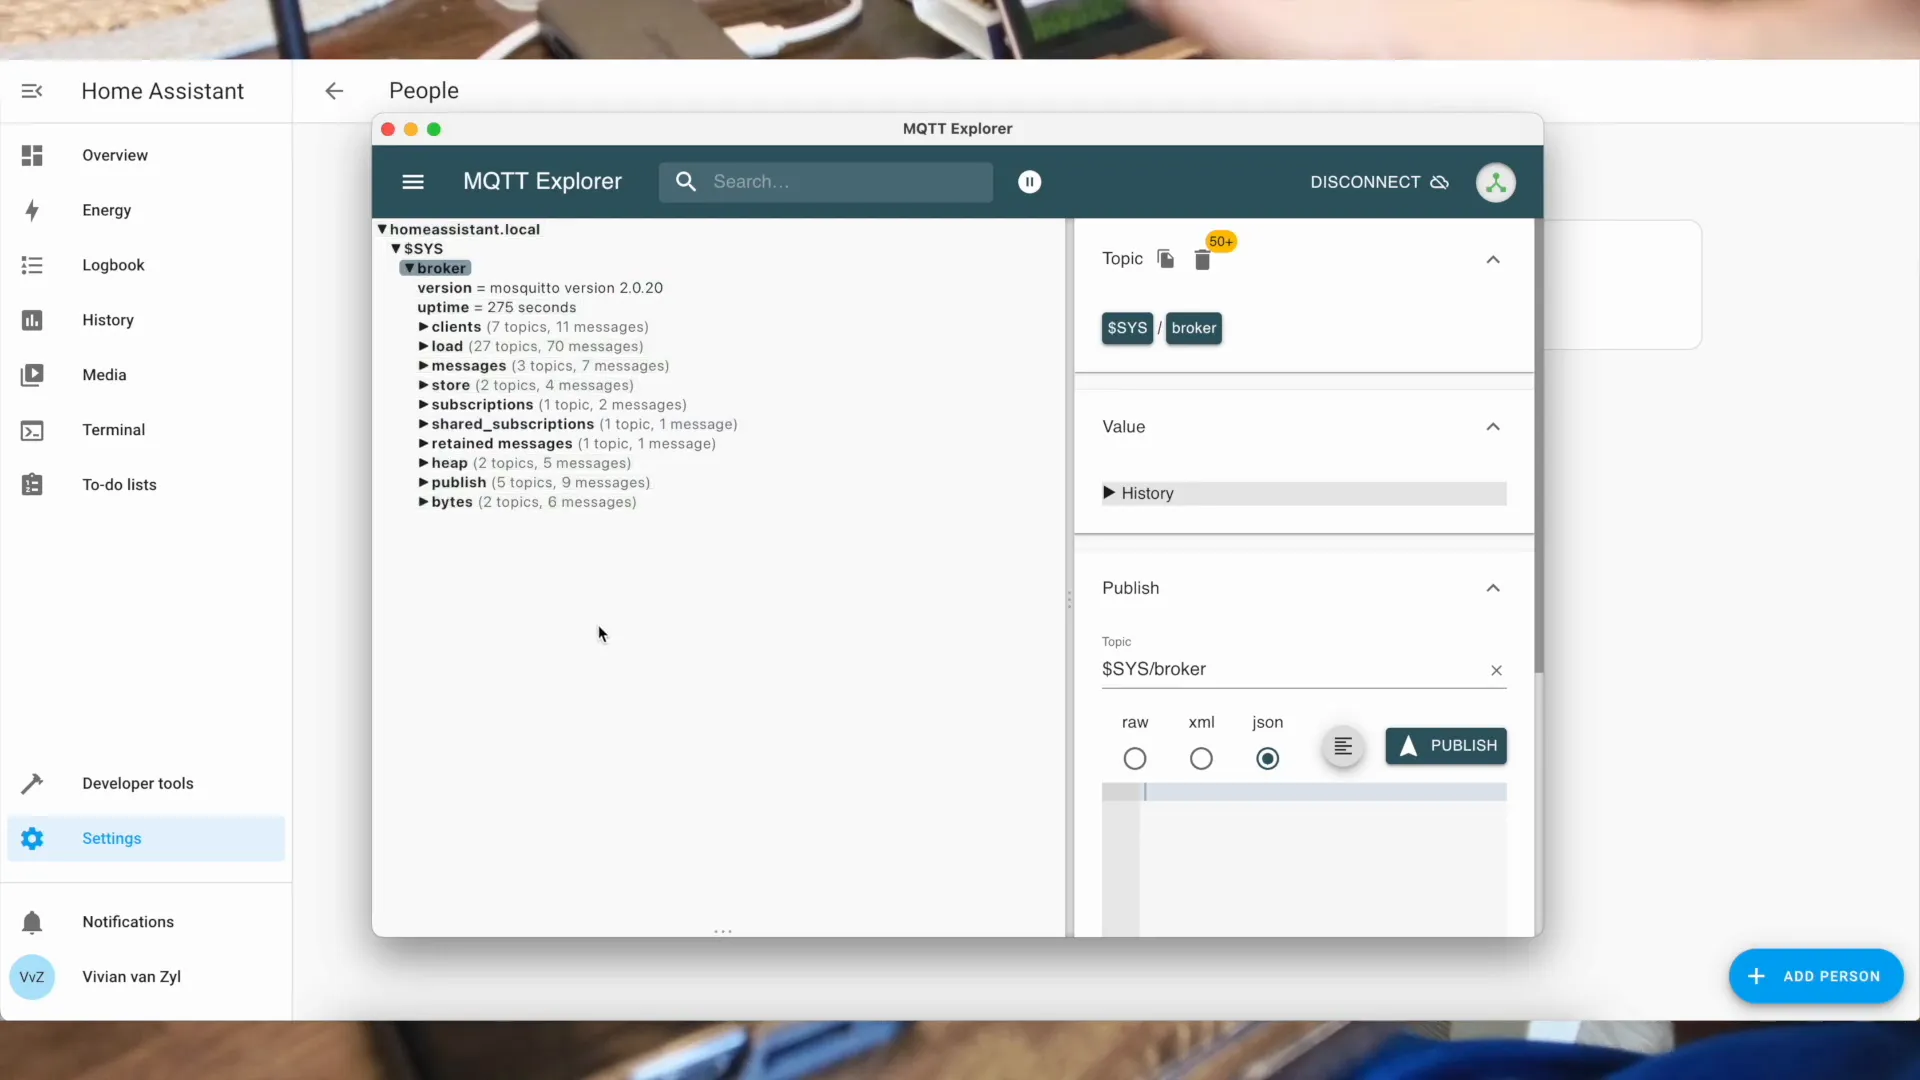
Setting Up MQTT Explorer
To monitor the messages sent to the Mosquitto broker, you can use MQTT Explorer. This tool provides a graphical interface to visualize and debug the messages flowing through your MQTT setup. Download and install MQTT Explorer suitable for your operating system.
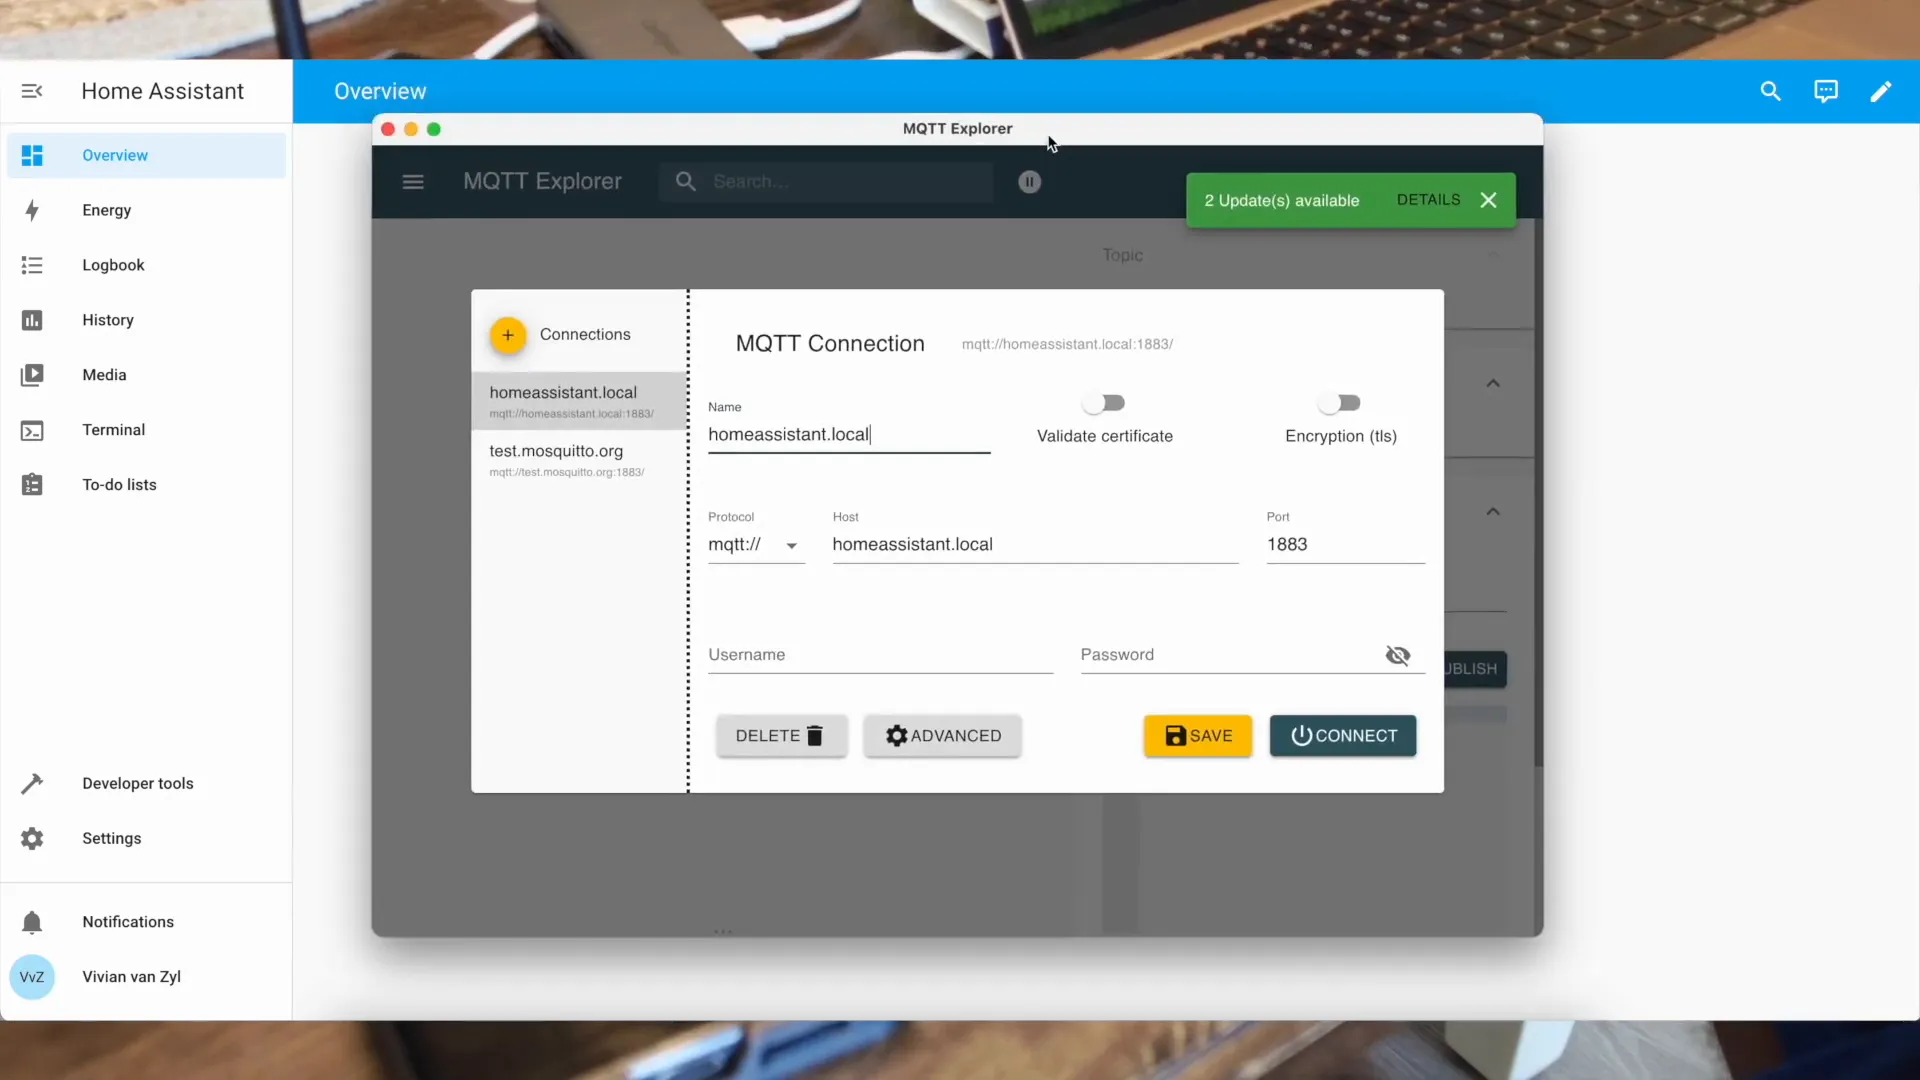
Launch MQTT Explorer and connect to your Mosquitto broker using the following details: host: homeassistant.local, port: 1883. If you set up authentication, be sure to enter your username and password. Once connected, you will see all the messages being published to your MQTT topics.

Adding MQTT to Home Assistant
To integrate your Meshtastic nodes with Home Assistant, the first step is to add MQTT support. This is essential for establishing a communication channel between your nodes and Home Assistant. By leveraging MQTT, you can easily send and receive messages, enabling real-time data updates from your Meshtastic devices.
Start by accessing your Home Assistant interface. Once there, navigate to the Add-On Store and search for the Mosquitto broker. This broker will handle the MQTT communication. Click on 'Install' and ensure that you configure it to start on boot for consistent operation.
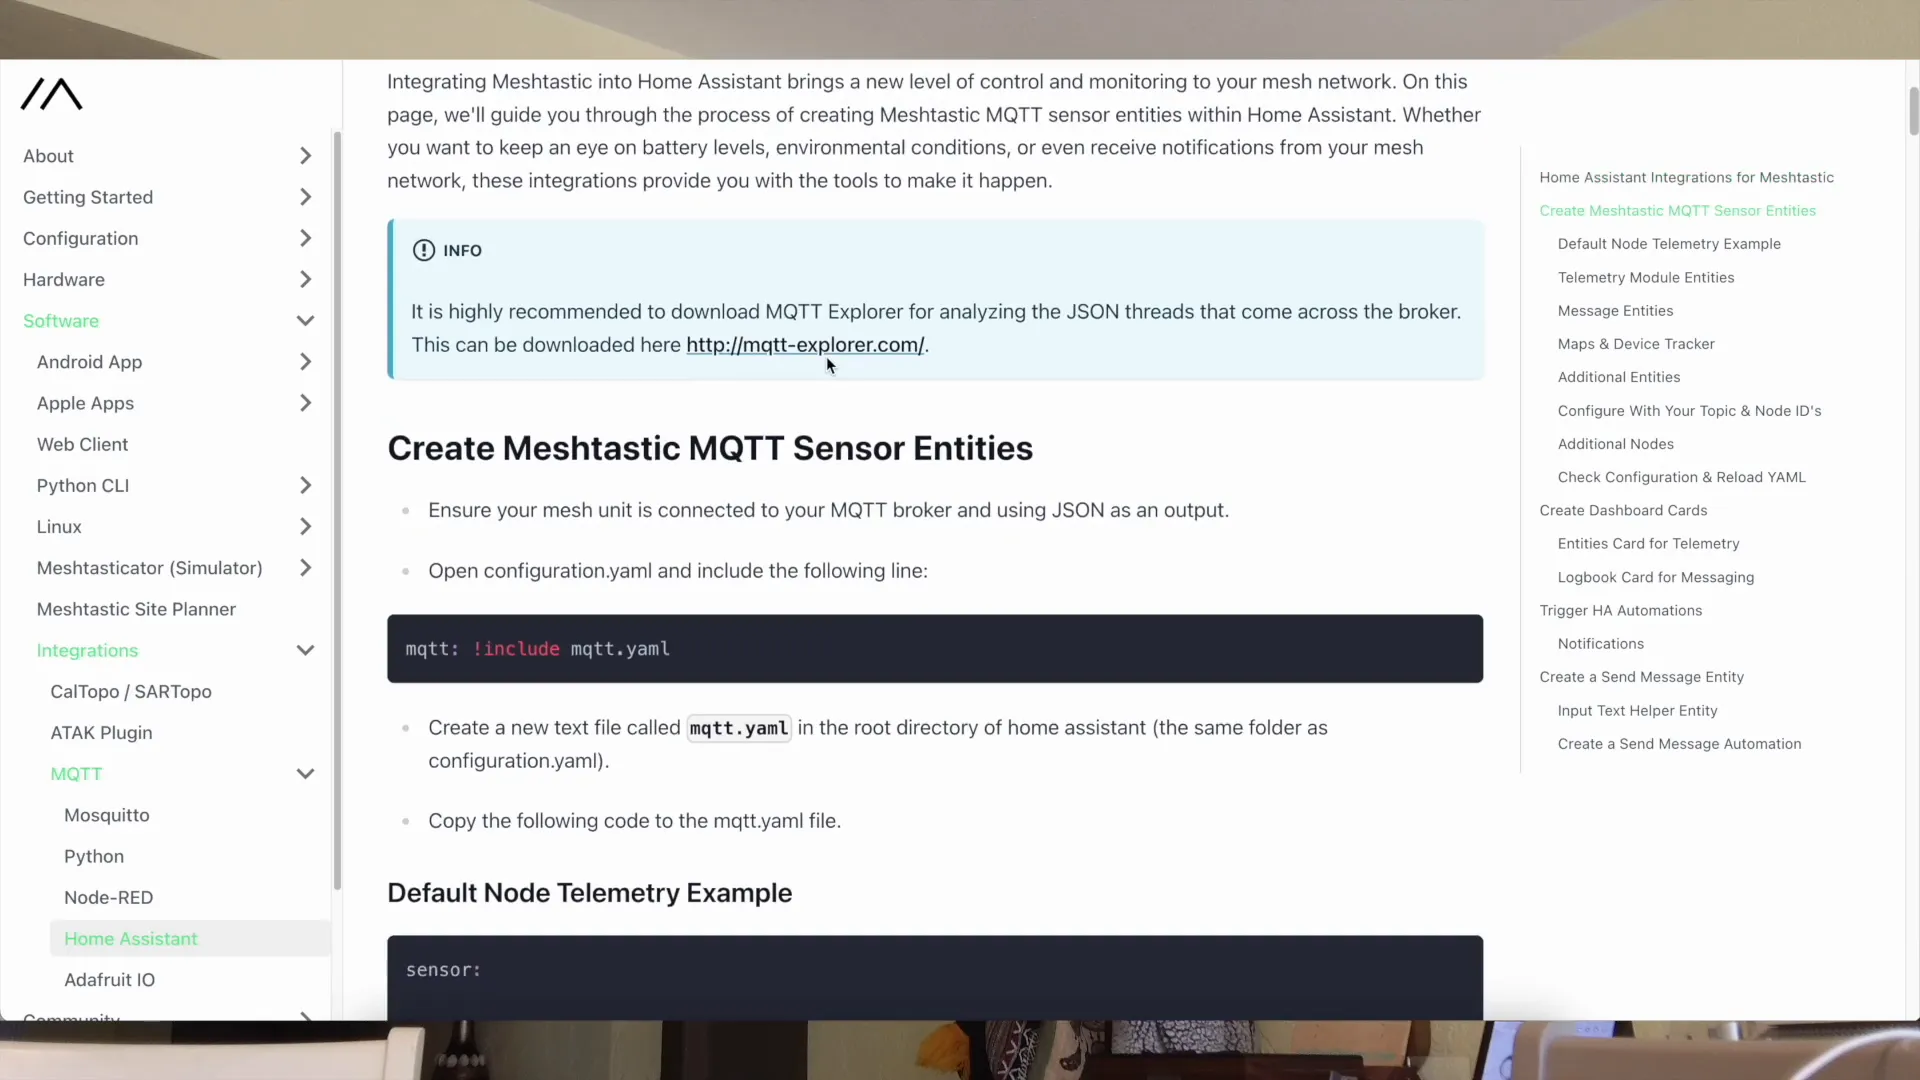
Configuring MQTT in Configuration.yaml
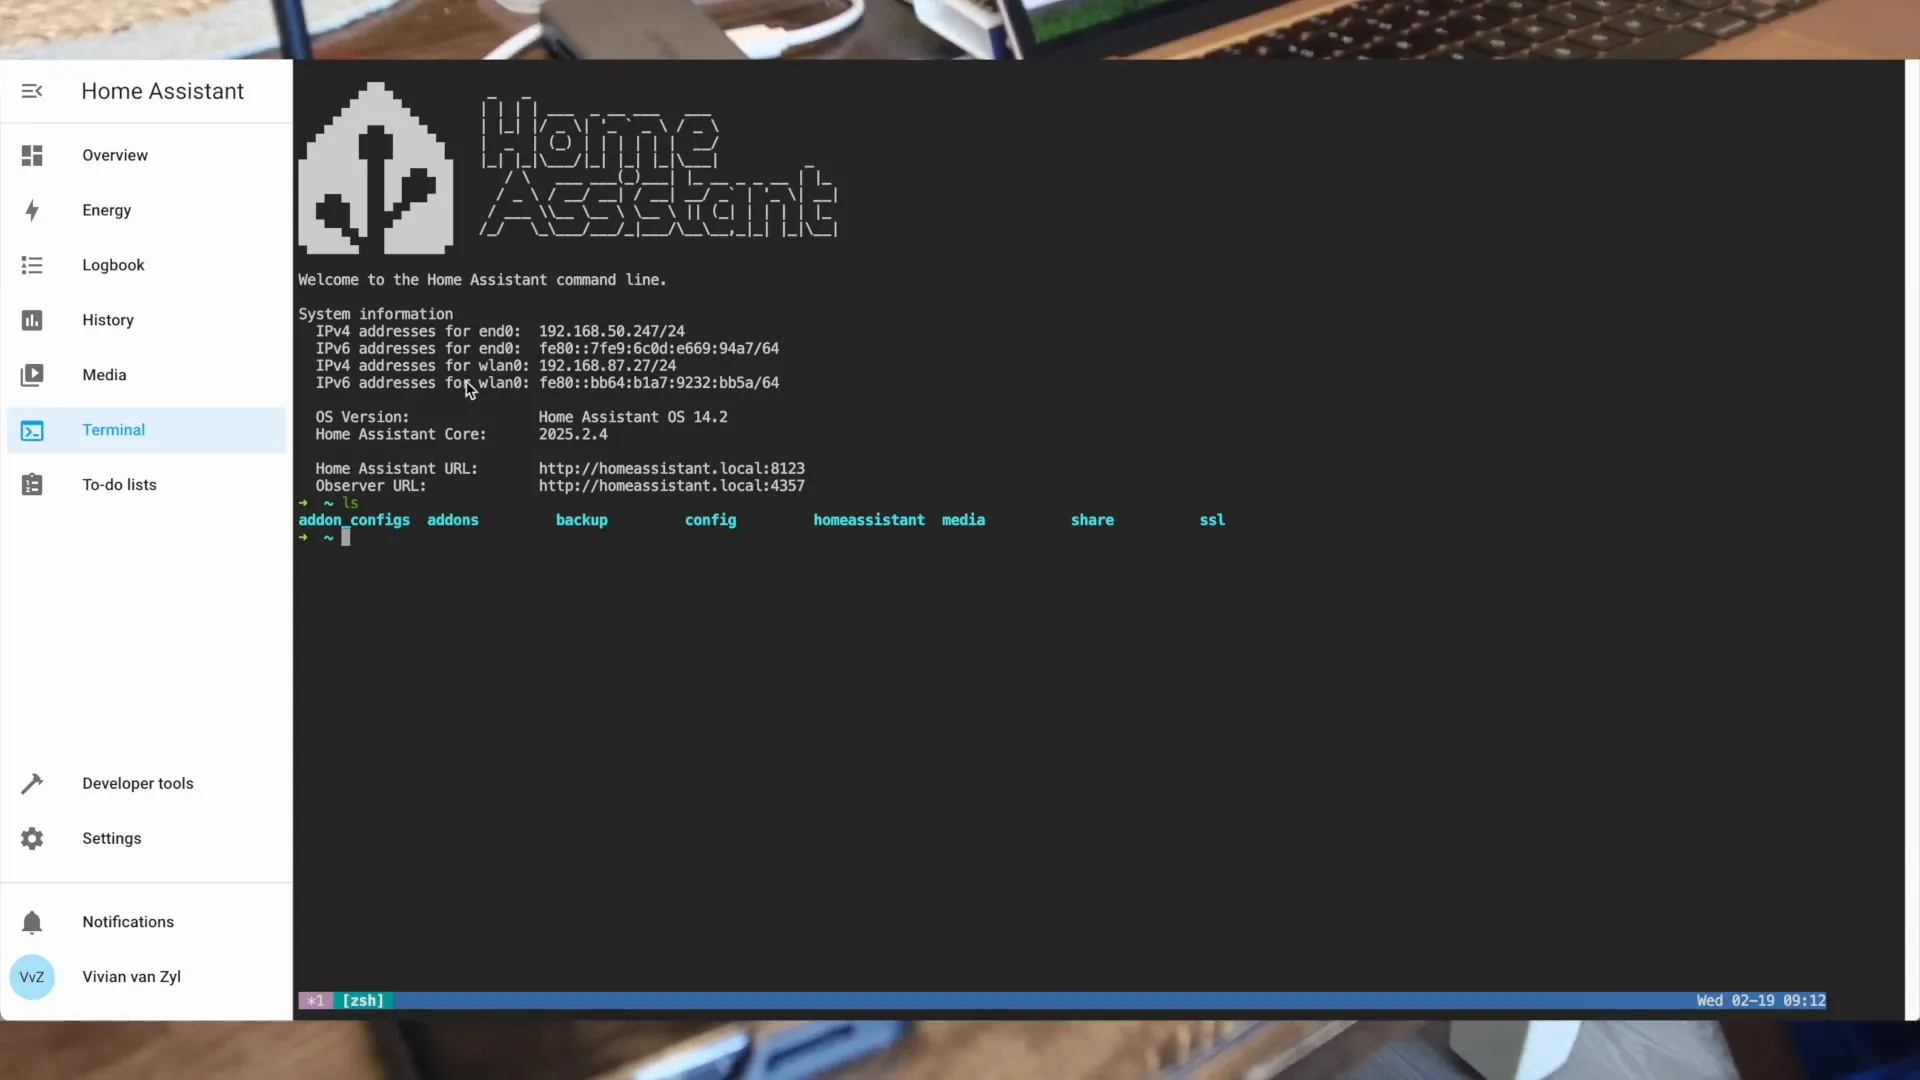
Once the Mosquitto broker is installed, you need to configure it in the configuration.yaml file. This file is crucial as it dictates how Home Assistant interacts with your devices. Open the terminal via the SSH add-on you previously installed and navigate to the configuration directory.
Use a text editor like nano to open the configuration.yaml file. You need to include the MQTT integration by adding the following lines:
mqtt: !include mqtt.yaml
After adding these lines, save your changes and exit the editor. This configuration tells Home Assistant to connect to the Mosquitto broker running on the same device.
Setting Up MQTT Discovery in Home Assistant
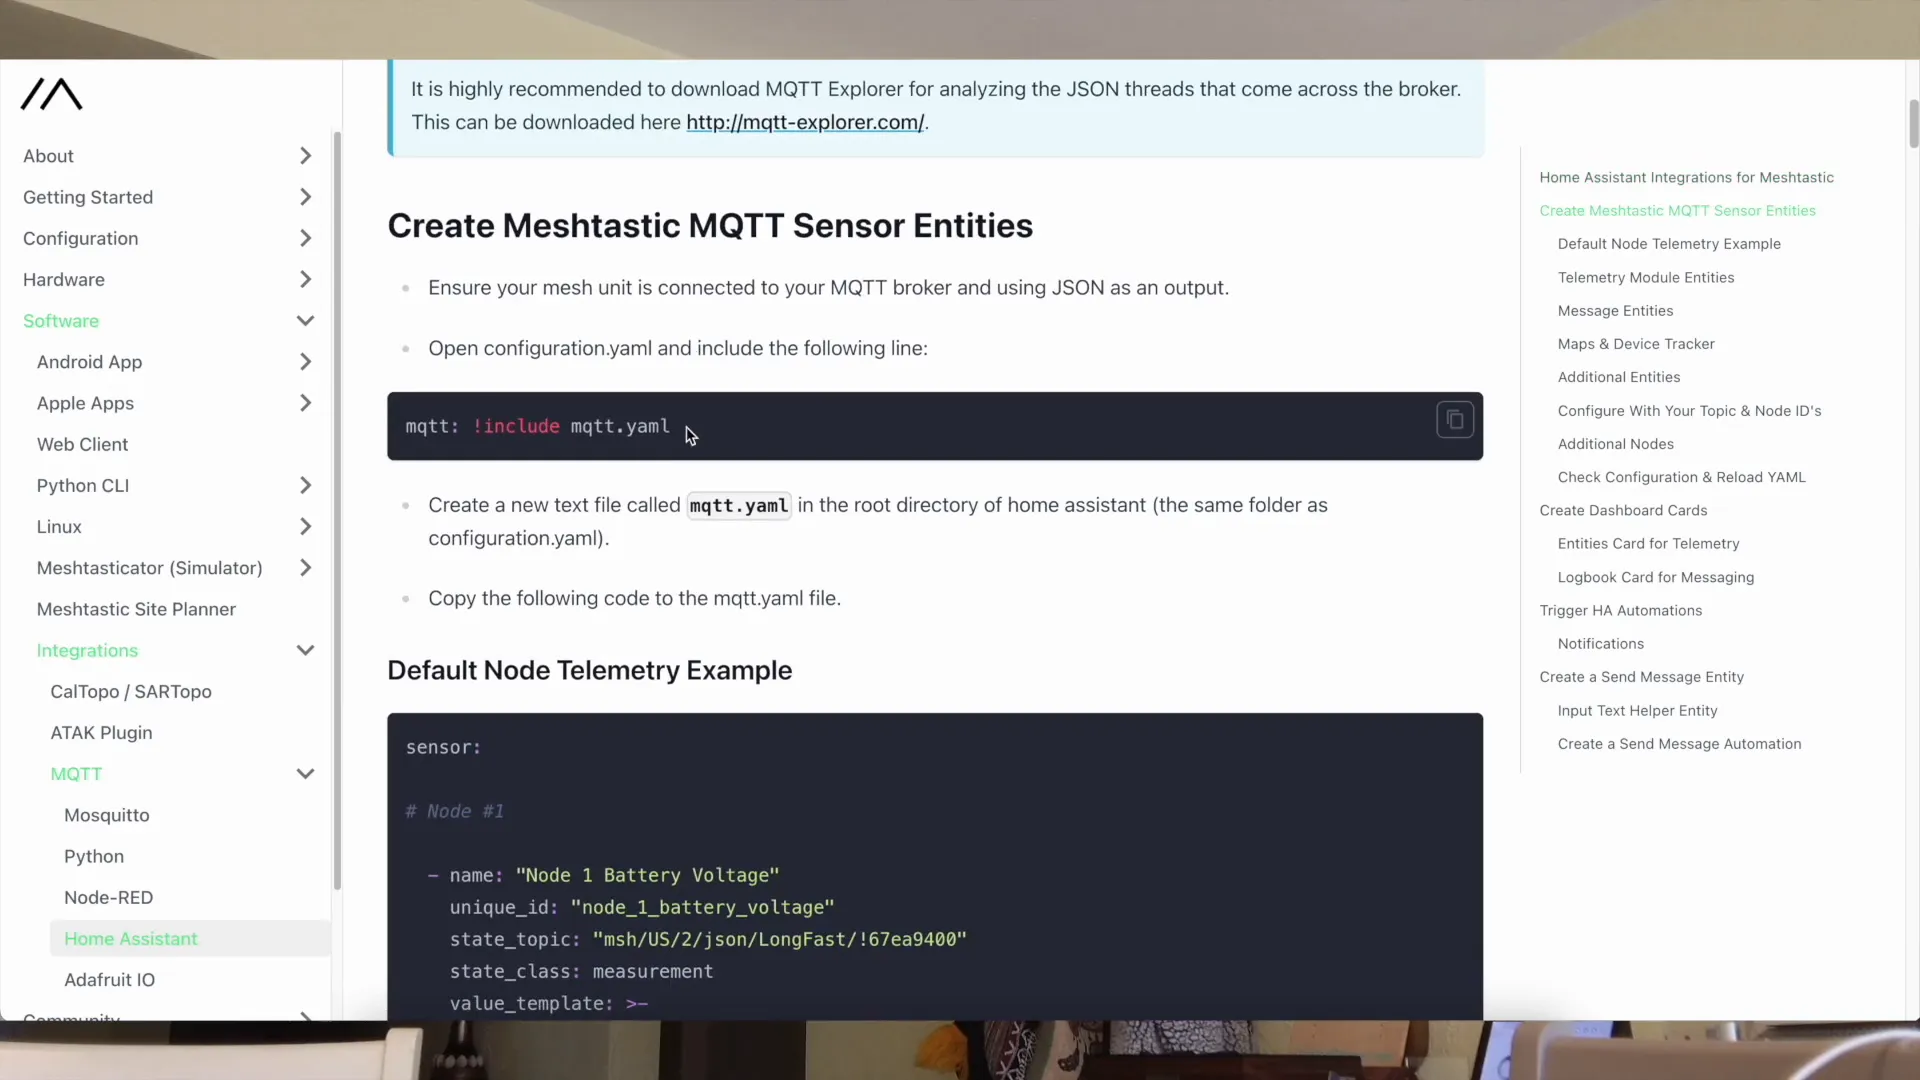
Next, you will want to enable MQTT discovery, which allows Home Assistant to automatically find and configure your Meshtastic nodes. To do this, add the following lines to your mqtt.yaml file:
sensor:

# HAT Node

  - name: "HAT Node Battery Voltage"
    unique_id: "node_hat_battery_voltage"
    state_topic: "msh/US/2/json/LongFast/!67f79ec6"
    state_class: measurement
    value_template: >-
      {% if value_json.from == 1744281286 and
            value_json.payload.voltage is defined and
            value_json.payload.temperature is not defined %}
        {{ (value_json.payload.voltage | float) | round(2) }}
      {% else %}
        {{ this.state }}
      {% endif %}
    unit_of_measurement: "Volts"
    # Telemetry packets come in two flavors: The default node telemetry, and the I2C sensor data.
    # Both packets contain "voltage" so we check for temperature to ignore the sensor packet here.

  - name: "HAT Node Battery Percent"
    unique_id: "node_hat_battery_percent"
    state_topic: "msh/US/2/json/LongFast/!67f79ec6"
    state_class: measurement
    value_template: >-
      {% if value_json.from == 1744281286 and value_json.payload.battery_level is defined %}
        {{ (value_json.payload.battery_level | float) | round(2) }}
      {% else %}
        {{ this.state }}
      {% endif %}
    device_class: "battery"
    unit_of_measurement: "%"

  - name: "HAT Node ChUtil"
    unique_id: "node_hat_chutil"
    state_topic: "msh/US/2/json/LongFast/!67f79ec6"
    state_class: measurement
    value_template: >-
      {% if value_json.from == 1744281286 and value_json.payload.channel_utilization is defined %}
        {{ (value_json.payload.channel_utilization | float) | round(2) }}
      {% else %}
        {{ this.state }}
      {% endif %}
    unit_of_measurement: "%"

  - name: "HAT Node AirUtilTX"
    unique_id: "node_hat_airutiltx"
    state_topic: "msh/US/2/json/LongFast/!67f79ec6"
    state_class: measurement
    value_template: >-
      {% if value_json.from == 1744281286 and value_json.payload.air_util_tx is defined %}
        {{ (value_json.payload.air_util_tx | float) | round(2) }}
      {% else %}
        {{ this.state }}
      {% endif %}
    unit_of_measurement: "%"

# MESSAGES
  - name: "HAT Node Messages"
    unique_id: "node_hat_messages"
    state_topic: "msh/US/2/json/LongFast/!67f79ec6"
    value_template: >-
      {% if value_json.from == 1744281286 and value_json.payload.text is defined %}
        {{ value_json.payload.text }}
      {% else %}
        {{ this.state }}
      {% endif %}

  - name: "HAT Node DMS"
    unique_id: "node_hat_dms"
    state_topic: "msh/US/2/json/PKI/!67f79ec6"
    value_template: >-
      {% if value_json.from == 1744281286 and value_json.payload.text is defined %}
        {{ value_json.payload.text }}
      {% else %}
        {{ this.state }}
      {% endif %}


# SOLAR Node

  - name: "SOLAR Node Battery Voltage"
    unique_id: "node_solar_battery_voltage"
    state_topic: "msh/US/2/json/LongFast/!67f79ec6"
    state_class: measurement
    value_template: >-
      {% if value_json.from == 2470382833 and
            value_json.payload.voltage is defined and
            value_json.payload.temperature is not defined %}
        {{ (value_json.payload.voltage | float) | round(2) }}
      {% else %}
        {{ this.state }}
      {% endif %}
    unit_of_measurement: "Volts"
    # Telemetry packets come in two flavors: The default node telemetry, and the I2C sensor data.
    # Both packets contain "voltage" so we check for temperature to ignore the sensor packet here.

  - name: "SOLAR Node Battery Percent"
    unique_id: "node_solar_battery_percent"
    state_topic: "msh/US/2/json/LongFast/!67f79ec6"
    state_class: measurement
    value_template: >-
      {% if value_json.from == 2470382833 and value_json.payload.battery_level is defined %}
        {{ (value_json.payload.battery_level | float) | round(2) }}
      {% else %}
        {{ this.state }}
      {% endif %}
    device_class: "battery"
    unit_of_measurement: "%"

  - name: "SOLAR Node ChUtil"
    unique_id: "node_solar_chutil"
    state_topic: "msh/US/2/json/LongFast/!67f79ec6"
    state_class: measurement
    value_template: >-
      {% if value_json.from == 2470382833 and value_json.payload.channel_utilization is defined %}
        {{ (value_json.payload.channel_utilization | float) | round(2) }}
      {% else %}
        {{ this.state }}
      {% endif %}
    unit_of_measurement: "%"

  - name: "SOLAR Node AirUtilTX"
    unique_id: "node_solar_airutiltx"
    state_topic: "msh/US/2/json/LongFast/!67f79ec6"
    state_class: measurement
    value_template: >-
      {% if value_json.from == 2470382833 and value_json.payload.air_util_tx is defined %}
        {{ (value_json.payload.air_util_tx | float) | round(2) }}
      {% else %}
        {{ this.state }}
      {% endif %}
    unit_of_measurement: "%"

  - name: "Solar Node Temperature"
    unique_id: "node_solar_temperature"
    state_topic: "msh/US/2/json/LongFast/!67f79ec6"
    state_class: measurement
    value_template: >-
      {% if value_json.from == 2470382833 and value_json.payload.temperature is defined %}
        {{ (((value_json.payload.temperature | float) * 1.8) +32) | round(2) }}
      {% else %}
        {{ this.state }}
      {% endif %}
    device_class: "temperature"
    unit_of_measurement: "°F"
# With device_class: "temperature" set, make sure to use the configured unit for temperature in your HA instance.
# If you don't, then non-temperature messages will change the value of this sensor by reinterpreting the current state with the wrong unit, unless you account for it.
# For Celsius use:    {{ (value_json.payload.temperature | float) | round(1) }}
# For Fahrenheit use: {{ (((value_json.payload.temperature | float) * 1.8) +32) | round(2) }}

  - name: "SOLAR Node Humidity"
    unique_id: "node_solar_humidity"
    state_topic: "msh/US/2/json/LongFast/!67f79ec6"
    state_class: measurement
    value_template: >-
      {% if value_json.from == 2470382833 and value_json.payload.relative_humidity is defined %}
        {{ (value_json.payload.relative_humidity | float) | round(2) }}
      {% else %}
        {{ this.state }}
      {% endif %}
    device_class: "humidity"
    unit_of_measurement: "%"


# HOME Node

  - name: "HOME Node Battery Voltage"
    unique_id: "node_home_battery_voltage"
    state_topic: "msh/US/2/json/LongFast/!67f79ec6"
    state_class: measurement
    value_template: >-
      {% if value_json.from == 2426471268 and
            value_json.payload.voltage is defined and
            value_json.payload.temperature is not defined %}
        {{ (value_json.payload.voltage | float) | round(2) }}
      {% else %}
        {{ this.state }}
      {% endif %}
    unit_of_measurement: "Volts"
    # Telemetry packets come in two flavors: The default node telemetry, and the I2C sensor data.
    # Both packets contain "voltage" so we check for temperature to ignore the sensor packet here.

  - name: "HOME Node Battery Percent"
    unique_id: "node_home_battery_percent"
    state_topic: "msh/US/2/json/LongFast/!67f79ec6"
    state_class: measurement
    value_template: >-
      {% if value_json.from == 2426471268 and value_json.payload.battery_level is defined %}
        {{ (value_json.payload.battery_level | float) | round(2) }}
      {% else %}
        {{ this.state }}
      {% endif %}
    device_class: "battery"
    unit_of_measurement: "%"

  - name: "HOME Node ChUtil"
    unique_id: "node_home_chutil"
    state_topic: "msh/US/2/json/LongFast/!67f79ec6"
    state_class: measurement
    value_template: >-
      {% if value_json.from == 2426471268 and value_json.payload.channel_utilization is defined %}
        {{ (value_json.payload.channel_utilization | float) | round(2) }}
      {% else %}
        {{ this.state }}
      {% endif %}
    unit_of_measurement: "%"

  - name: "HOME Node AirUtilTX"
    unique_id: "node_home_airutiltx"
    state_topic: "msh/US/2/json/LongFast/!67f79ec6"
    state_class: measurement
    value_template: >-
      {% if value_json.from == 2426471268 and value_json.payload.air_util_tx is defined %}
        {{ (value_json.payload.air_util_tx | float) | round(2) }}
      {% else %}
        {{ this.state }}
      {% endif %}
    unit_of_measurement: "%"

  - name: "HOME Node Temperature"
    unique_id: "node_home_temperature"
    state_topic: "msh/US/2/json/LongFast/!67f79ec6"
    state_class: measurement
    value_template: >-
      {% if value_json.from == 2426471268 and value_json.payload.temperature is defined %}
        {{ (((value_json.payload.temperature | float) * 1.8) +32) | round(2) }}
      {% else %}
        {{ this.state }}
      {% endif %}
    device_class: "temperature"
    unit_of_measurement: "°F"
# With device_class: "temperature" set, make sure to use the configured unit for temperature in your HA instance.
# If you don't, then non-temperature messages will change the value of this sensor by reinterpreting the current state with the wrong unit, unless you account for it.
# For Celsius use:    {{ (value_json.payload.temperature | float) | round(1) }}
# For Fahrenheit use: {{ (((value_json.payload.temperature | float) * 1.8) +32) | round(2) }}

  - name: "HOME Node Humidity"
    unique_id: "node_home_humidity"
    state_topic: "msh/US/2/json/LongFast/!67f79ec6"
    state_class: measurement
    value_template: >-
      {% if value_json.from == 2426471268 and value_json.payload.relative_humidity is defined %}
        {{ (value_json.payload.relative_humidity | float) | round(2) }}
      {% else %}
        {{ this.state }}
      {% endif %}
    device_class: "humidity"
    unit_of_measurement: "%"

  - name: "HOME Node Gas Resistance"
    unique_id: "node_home_gas_resistance"
    state_topic: "msh/US/2/json/LongFast/!67f79ec6"
    state_class: measurement
    value_template: >-
      {% if value_json.from == 2426471268 and value_json.payload.gas_resistance is defined %}
        {{ (value_json.payload.gas_resistance | float) | round(2) }}
      {% else %}
        {{ this.state }}
      {% endif %}
    unit_of_measurement: "MOhms"
These settings enable Home Assistant to listen for MQTT messages that announce new devices. Make sure to save the changes and check your configuration for any errors before restarting Home Assistant.
Viewing MQTT Messages with Explorer
To monitor the messages being sent from your Meshtastic nodes, you can use MQTT Explorer.
Once connected, you will see all the messages published to your MQTT topics. This is a great way to verify that your Meshtastic nodes are sending data correctly.
Wrapping Up
Now that you've successfully integrated your Meshtastic nodes with Home Assistant using MQTT, you can start enjoying the benefits of a connected smart home. The data from your nodes can be visualized, monitored, and even acted upon through automations. Explore the various possibilities that come with this integration, such as creating dashboards, setting up alerts, and more!
Remember, this is just the beginning. Home Assistant is an incredibly powerful tool, and by connecting your Meshtastic devices, you open the door to endless automation possibilities.
FAQ
What is Meshtastic?
Meshtastic is an open-source project that allows users to create a mesh network using low-cost LoRa devices. It enables long-range communication without relying on traditional Wi-Fi or internet infrastructure.
How does MQTT work with Home Assistant?
MQTT (Message Queuing Telemetry Transport) is a lightweight messaging protocol that is ideal for IoT applications. In Home Assistant, MQTT acts as a broker to facilitate communication between devices, allowing them to send and receive data in real-time.
Can I use Meshtastic nodes without Home Assistant?
Yes, you can use Meshtastic nodes independently. However, integrating them with Home Assistant enhances their functionality by providing a centralized platform to monitor and control your devices.
What do I do if I encounter issues with MQTT?
If you face issues with your MQTT setup, check the following:
- Ensure the Mosquitto broker is running.
- Verify your username and password settings.
- Use MQTT Explorer to see if messages are being published correctly.
- Check your configuration.yaml file for errors.
If problems persist, consult the Home Assistant community for support.